
Choosing Thermal Break Aluminum System Windows requires more than comparing frame color, glass thickness, or showroom appearance. The U.S. Department of Energy reports that windows can account for approximately 25–30% of residential heating and cooling energy use. This figure makes frame design a practical energy decision, not merely an architectural preference. A thermal break separates the interior and exterior aluminum sections with a low-conductivity polyamide barrier. It reduces conductive heat transfer and helps limit interior surface condensation.
Performance still depends on the complete window system. The frame, glazing, spacers, seals, drainage paths, and installation method must work together. National Fenestration Rating Council labels provide independently verified U-factor, solar heat gain coefficient, visible transmittance, and air-leakage information. These values allow fair comparisons between products. Lower U-factor generally indicates better insulation, while SHGC should match the climate, orientation, shading, and window size. Small details matter. A south-facing window in a hot climate may need different glass than a shaded northern elevation.
The International Energy Agency identifies buildings as responsible for roughly 30% of global final energy consumption, reinforcing the value of efficient building components. Yet no universal specification fits every project. That is the part many buying guides overlook. A high-performance frame cannot correct poor installation or unsuitable glass. Review tested performance data, thermal-bridge details, warranty terms, and local weather conditions before choosing. Ask for certification, not promises. Then examine how the window behaves at the sill, corner, and meeting rail. Real performance is often decided there.
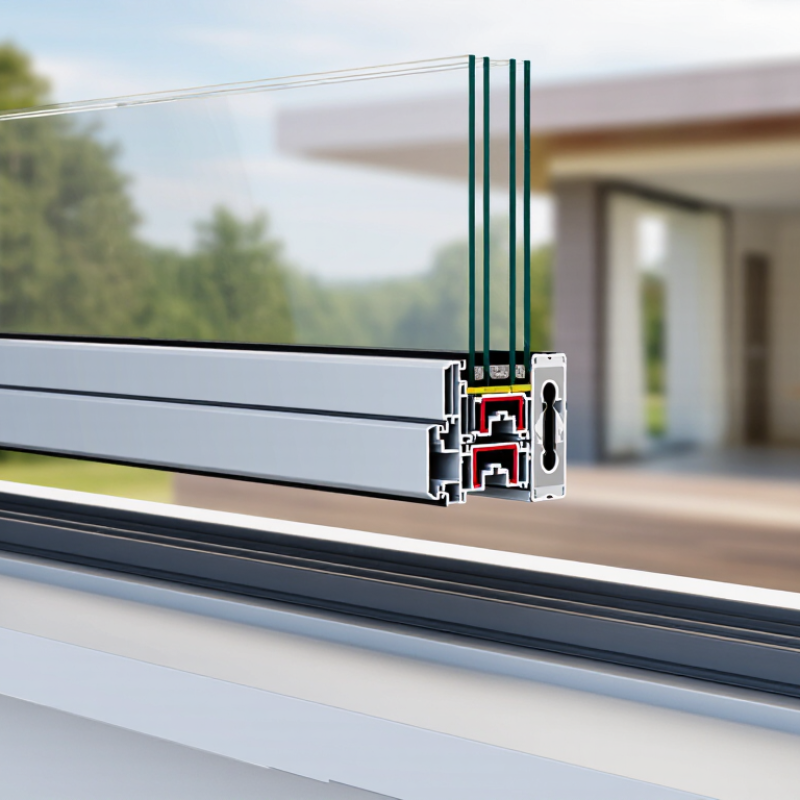
Understanding thermal break aluminum system windows starts with one detail: the metal frame is divided by an insulating polyamide strip. This barrier reduces direct heat flow through the aluminum. In a cold room, the inner frame should feel less icy near the glass edge. In a hot climate, it can limit heat entering around the sash. That difference is practical, not merely promotional. During site checks, I examine frame depth, gasket compression, corner joints, and drainage paths. A strong profile can still perform poorly when installation leaves small gaps. Air leakage is often the quiet problem.
When choosing a system, compare whole-window performance rather than aluminum thickness alone. Check U-value, air leakage, water resistance, and tested wind pressure. Lower U-values generally indicate better insulation, but the glass specification matters greatly. Double glazing may suit mild conditions. Low-emissivity coatings and gas-filled cavities can improve comfort in harsher climates. Ask for test reports, installation details, and maintenance guidance. Reliable documentation matters.
I once focused too much on frame appearance. That was a mistake. A slim profile looked elegant, yet its drainage design needed more attention. Check the sill after rain. Listen for rattling during strong wind. Also examine hardware adjustment access, because seals may need service over time. Thermal breaks help, but they cannot correct poor glass, careless fitting, or weak surrounding walls. Real performance depends on the complete opening.
| Selection Dimension | What to Check | Practical Reference Data | Recommended Choice |
|---|---|---|---|
| Thermal Break Material | Look for a continuous, mechanically secured insulating strip between the interior and exterior aluminum sections. | Polyamide is commonly used because its thermal conductivity is much lower than aluminum. Typical thermal-break widths are approximately 14–34 mm, depending on the system. | Choose a continuous thermal break sized for the project’s climate, window depth, and required U-factor. |
| Whole-Window U-Factor | Check the complete tested window, including frame, sash, spacer, glazing, and seals—not only the center-of-glass value. | A whole-window U-factor of about 1.4–2.0 W/m²·K is commonly considered a strong range for many energy-efficient designs. Lower values indicate better insulation. | Use the lowest practical U-factor that meets the local energy code and project budget. |
| Glazing Configuration | Compare single, double, or triple glazing, glass thickness, cavity width, coating, and gas filling. | Double glazing generally provides better insulation than single glazing. Triple glazing can reduce heat transfer further but adds weight, depth, and cost. | Use double glazing for many moderate climates; consider triple glazing for cold climates or highly insulated buildings. |
| Low-Emissivity Coating | Confirm the coating location and whether it is optimized for heating, cooling, or mixed climates. | Low-e coatings reduce infrared heat transfer while allowing visible daylight to pass through. Performance varies by coating type and glass arrangement. | Select a coating based on orientation, local solar exposure, heating demand, and cooling demand. |
| Solar Heat Gain Coefficient | Review SHGC on a scale from 0 to 1. It indicates the fraction of incident solar energy entering through the window. | Typical energy-efficient selections may fall around 0.25–0.40, but the ideal value depends strongly on climate and window orientation. | Choose a lower SHGC for hot, sunny exposures and a moderate or higher SHGC where useful winter solar gain is desired. |
| Air Leakage | Check the tested air-leakage rate for the complete operable window and the test pressure used. | Lower air leakage improves comfort and reduces uncontrolled energy loss. A project target of approximately 0.3–0.5 L/s·m² at 75 Pa is a useful high-performance reference. | Prioritize low leakage, continuous gaskets, reliable corner joints, and correctly installed perimeter seals. |
| Water Penetration Resistance | Review the water test pressure and confirm that the drainage paths, weep holes, gaskets, and sill design are properly detailed. | Required performance depends on building height, exposure, façade design, local rainfall, and wind-driven rain conditions. | Specify a tested water-resistance level suitable for the site rather than relying only on profile appearance. |
| Wind Load Capacity | Confirm design pressure, positive and negative pressure ratings, sash size limits, mullion strength, and anchoring requirements. | The required pressure is project-specific and depends on wind speed, building height, terrain, location, and exposure category. | Use project-calculated wind pressures and request structural calculations for large or high-level windows. |
| Frame Depth and Profile Design | Compare frame depth, glazing pocket, drainage design, reinforcement space, and compatibility with wall construction. | Deeper profiles can accommodate wider thermal breaks, thicker glazing, stronger reinforcement, and improved drainage. | Select a profile that matches the glass thickness, structural span, insulation zone, and installation method. |
| Spacer and Edge-of-Glass Design | Check whether the insulating-glass spacer is thermally improved and properly sealed. | Warm-edge spacers generally reduce edge heat loss and interior condensation risk compared with highly conductive metal spacers. | Use a compatible warm-edge spacer where condensation control and perimeter thermal performance are important. |
| Condensation Control | Evaluate interior surface temperatures, indoor humidity, exterior temperature, glazing, spacer, and frame geometry. | Thermal breaks reduce cold bridging, but they cannot eliminate condensation under all combinations of low outdoor temperature and high indoor humidity. | Use thermal modeling or condensation analysis for cold climates and high-humidity interiors. |
| Acoustic Performance | Check tested sound-insulation ratings and the complete assembly, including glass, frame, seals, and installation joints. | Many residential window assemblies achieve approximately 30–40 dB sound reduction, while the actual result depends mainly on glazing and airtightness. | Use laminated, asymmetric, or thicker insulating glass where traffic or urban noise is a concern. |
| Hardware and Operating Type | Compare casement, tilt-and-turn, sliding, fixed, and folding configurations for sealing, ventilation, size, and maintenance. | Compression-sealed operating types typically offer better air tightness than many sliding types, while sliding windows can provide convenient operation and space efficiency. | Choose the operating type according to ventilation needs, accessibility, weather exposure, and required air leakage. |
| Testing and Documentation | Request current test reports for thermal transmittance, air leakage, water resistance, wind pressure, and acoustic performance where applicable. | Test values are meaningful only when the tested size, glazing, configuration, and installation conditions match the proposed project. | Compare independently verified whole-window data and confirm that the tested assembly matches the final specification. |
| Installation Compatibility | Review sill flashing, perimeter insulation, air barriers, drainage, fasteners, tolerances, and interfaces with the wall system. | Poor installation can significantly reduce the thermal, air, and water performance measured in laboratory testing. | Select a system with clear installation details and coordinate the window with the building’s air, water, and thermal-control layers. |
| Maintenance and Service Life | Assess coating durability, gasket replacement, drainage cleaning, hardware adjustment, and availability of compatible spare parts. | Aluminum is durable and corrosion-resistant when properly finished, but seals, hardware, drainage paths, and moving components require periodic inspection. | Choose a system with accessible maintenance points, replaceable seals, and clear cleaning and service procedures. |
Note: The reference ranges are general design guidance. Final window performance should be selected from project-specific calculations, applicable energy codes, local climate conditions, and verified whole-window test data.